Sato Cymbidium orchids, known for their stunning blooms and resilience, have become a popular choice among orchid enthusiasts. Growing these beautiful plants from seedlings can be a rewarding experience, allowing you to nurture them from their earliest stages of development. In this article, we will explore the various steps involved in cultivating Sato Cymbidium orchids from seedlings, covering everything from seedling selection to initial planting techniques.
## 1. Understanding Sato Cymbidium Orchids
Before diving into the growing process, it’s essential to understand what Sato Cymbidium orchids are and what makes them unique. This orchid species, characterized by its large, vibrant flowers and lush foliage, thrives in various environments, making it a favorite among both novice and experienced growers.
### 1.1 Origin and Characteristics
Sato Cymbidium orchids are primarily found in the subtropical regions of Asia. They are known for their ability to adapt to different conditions, which contributes to their popularity. The key characteristics of these orchids include:
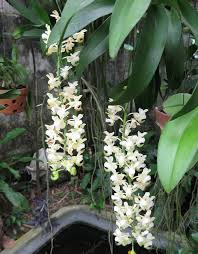
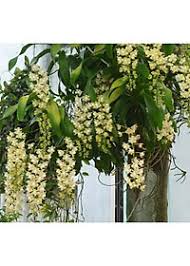
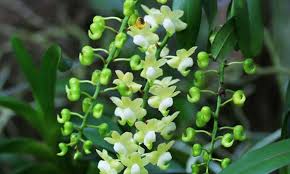
– **Flowers**: Sato Cymbidium orchids produce large, showy flowers that come in various colors, including white, yellow, pink, and green. The flowers can last for several weeks, adding vibrant beauty to any space.
– **Foliage**: The leaves of Sato Cymbidium orchids are long and strap-like, typically growing in a fan shape. Healthy leaves indicate that the plant is thriving and receiving adequate care.
– **Growth Habit**: These orchids are sympodial, meaning they grow laterally from a central stem, producing new pseudobulbs each season.
### 1.2 Choosing Quality Seedlings
When growing Sato Cymbidium orchids from seedlings, the first step is to select healthy, quality seedlings. Here are some factors to consider:
– **Source**: Purchase seedlings from reputable nurseries or orchid growers to ensure you are getting healthy, disease-free plants. Avoid buying from unknown sources, as these plants may harbor pests or diseases.
– **Age**: Opt for seedlings that are at least six months old. Younger seedlings may be more susceptible to environmental stress and disease.
– **Appearance**: Healthy seedlings should have vibrant green leaves, well-developed roots, and no signs of wilting or discoloration. Inspect the roots carefully, as healthy roots are essential for the plant’s overall health.
## 2. Preparing for Planting
Once you have selected your seedlings, it’s time to prepare for planting. This preparation involves creating the right environment for your Sato Cymbidium orchids to thrive.
### 2.1 Selecting the Right Growing Medium
Choosing the right growing medium is crucial for the health of your seedlings. Sato Cymbidium orchids prefer a well-draining mix that provides adequate aeration and moisture retention. Here are some options:
– **Orchid Bark Mix**: A blend of fir bark, pine bark, and charcoal is ideal for Sato Cymbidium orchids. This mix offers excellent drainage and aeration while retaining enough moisture for the roots.
– **Sphagnum Moss**: Using sphagnum moss in combination with orchid bark can help retain moisture and provide a stable environment for seedlings. Ensure the moss is well-washed and free from any contaminants.
– **Perlite or Vermiculite**: Adding perlite or vermiculite to your mix can enhance drainage and aeration. A mix of bark, sphagnum moss, and perlite is often effective for these orchids.
### 2.2 Pot Selection
Choosing the right pot is essential for successful growth. Here are some considerations for pot selection:
– **Size**: Select a pot that is slightly larger than the root system of the seedlings. Avoid pots that are too large, as excess soil can retain too much moisture, leading to root rot.
– **Material**: Clay pots are a popular choice for orchids, as they allow for better airflow and moisture control. Plastic pots can also be used but ensure they have sufficient drainage holes.
– **Drainage**: Ensure that the pot has multiple drainage holes to prevent water from accumulating at the bottom. Good drainage is vital for healthy root development.
### 2.3 Creating an Ideal Environment
Sato Cymbidium orchids thrive in specific environmental conditions. Here are some factors to consider when creating the ideal environment for your seedlings:
– **Temperature**: These orchids prefer temperatures between 60°F (15°C) at night and 75°F (24°C) during the day. Avoid exposing seedlings to extreme temperature fluctuations.
– **Humidity**: Maintain humidity levels between 50% and 70% for optimal growth. You can achieve this by misting the plants regularly or using a humidity tray filled with water and pebbles.
– **Light**: Sato Cymbidium orchids thrive in bright, indirect light. Avoid direct sunlight, as it can scorch the leaves. A south or east-facing window is often ideal for providing sufficient light.
## 3. Planting Your Seedlings
Now that you have prepared your growing medium, pot, and environment, it’s time to plant your Sato Cymbidium seedlings.
### 3.1 Planting Techniques
Follow these steps to ensure a successful planting process:
1. **Moisten the Growing Medium**: Before planting, lightly moisten the growing medium. This helps with soil cohesion and reduces stress on the seedlings during planting.
2. **Remove Seedlings from Their Container**: Gently remove the seedlings from their nursery pots. Be careful not to damage the roots during this process.
3. **Examine the Roots**: Inspect the roots for any signs of rot or damage. Trim any unhealthy roots with sterilized scissors to promote healthy growth.
4. **Place Seedlings in the Pot**: Position the seedlings in the center of the pot, ensuring that the roots are spread out and not crowded. Fill in around the roots with the growing medium, gently pressing it down to eliminate air pockets.
5. **Watering**: After planting, water the seedlings thoroughly to help settle the growing medium around the roots. Allow excess water to drain out of the pot.
### 3.2 Post-Planting Care
After planting, provide the appropriate care to ensure the seedlings thrive:
– **Avoid Direct Sunlight**: For the first few weeks after planting, keep the seedlings out of direct sunlight to prevent stress. Gradually reintroduce them to bright, indirect light.
– **Monitor Watering**: Check the moisture level of the growing medium regularly. Water when the top inch feels dry but avoid overwatering. Use pots with drainage holes to prevent waterlogging.
– **Fertilization**: Begin fertilizing your seedlings with a diluted, balanced orchid fertilizer once they have established roots, typically after about 6-8 weeks. Use a fertilizer with a ratio of 30-10-10 or 20-20-20 for healthy growth.
## 4. Conclusion
In this first part of our guide on growing Sato Cymbidium orchids from seedlings, we covered the importance of selecting quality seedlings, preparing the growing medium and pot, and the proper planting techniques. With the right approach, you can successfully nurture these beautiful orchids from their earliest stages of development.
In the next part of this article, we will explore advanced care techniques, including pest management, disease prevention, and seasonal adjustments to ensure your Sato Cymbidium orchids continue to thrive. By following these guidelines, you’ll be well on your way to growing a stunning collection of Sato Cymbidium orchids that will bring beauty and elegance to your space.
# How to Grow Sato Cymbidium Orchids from Seedlings: Part 2
In the first part of this guide, we discussed the basics of growing Sato Cymbidium orchids from seedlings, covering seedling selection, preparing the growing medium, potting techniques, and initial care. Now, in this second part, we will delve into advanced care techniques, including pest management, disease prevention, seasonal adjustments, and overall maintenance to ensure your Sato Cymbidium orchids thrive and produce stunning blooms.
## 5. Advanced Care Techniques
Once your Sato Cymbidium orchids are planted and established, maintaining optimal growing conditions becomes essential for their long-term health. Here are some advanced care techniques to help your orchids flourish:
### 5.1 Light Requirements
Proper lighting is crucial for the healthy growth of Sato Cymbidium orchids. Here are tips on managing light exposure:
– **Optimal Light Levels**: Sato Cymbidium orchids thrive in bright, indirect light. Ideally, they should receive 10-12 hours of light per day. A sheer curtain can filter harsh sunlight while still allowing adequate light.
– **Adjusting Light Exposure**: As the seasons change, adjust the light exposure accordingly. In winter, when sunlight is weaker, you may need to move your orchids closer to the window or supplement with grow lights.
– **Signs of Insufficient Light**: If the leaves appear leggy or are stretching toward the light source, your orchids may need more light. Conversely, yellowing leaves or leaf scorch indicates too much direct sunlight.
### 5.2 Watering Practices
Proper watering is essential for the health of your Sato Cymbidium orchids. Here are some watering tips:
– **Watering Frequency**: Water your orchids thoroughly when the top inch of the growing medium feels dry. In general, this may range from once a week to once every two weeks, depending on environmental conditions.
– **Watering Technique**: When watering, ensure that water reaches the roots and drains out of the bottom of the pot. Avoid letting the plant sit in standing water, as this can lead to root rot.
– **Use of Water Quality**: Rainwater or distilled water is preferable for orchids, as tap water may contain chemicals that can harm them. If using tap water, let it sit for 24 hours to allow chlorine to dissipate.
### 5.3 Fertilization Strategies
Feeding your Sato Cymbidium orchids is vital for their growth and flowering. Here are guidelines for fertilization:
– **Fertilizer Type**: Use a balanced orchid fertilizer with a ratio of 30-10-10 or 20-20-20. The first number represents nitrogen (N), which promotes foliage growth; the second represents phosphorus (P), which supports flowering; and the last represents potassium (K), which aids overall plant health.
– **Dilution and Frequency**: Dilute the fertilizer to half-strength and apply it every two to four weeks during the growing season (spring and summer). Reduce or cease fertilization during the dormant season (fall and winter).
– **Special Fertilizers**: Consider using bloom boosters during the flowering phase to enhance bloom size and longevity. These fertilizers typically have a higher phosphorus content.
## 6. Pest Management
Pests can be a significant threat to the health of Sato Cymbidium orchids. Being proactive in pest management can help protect your plants.
### 6.1 Common Pests
– **Aphids**: Small, soft-bodied insects that can cluster on flower buds and leaves, sucking sap from the plant. They may cause curling or yellowing of leaves.
– **Mealybugs**: These pests appear as white, cottony masses on the leaves and stems. They can cause wilting and poor growth.
– **Scale Insects**: Small, hard bumps that attach to stems and leaves, sucking sap. Infestations can lead to leaf drop and stunted growth.
– **Spider Mites**: Tiny pests that thrive in dry conditions. They cause stippling on leaves and may create fine webbing.
### 6.2 Prevention and Treatment
– **Regular Inspection**: Regularly inspect your orchids for any signs of pests. Early detection is key to preventing infestations.
– **Natural Remedies**: Use insecticidal soap or neem oil to treat pest infestations. Spray the affected areas thoroughly and repeat every 7-14 days until the pests are gone.
– **Hygiene Practices**: Maintain good hygiene by cleaning your pots and tools. Remove dead leaves and debris around the plants to reduce the risk of pests.
## 7. Disease Prevention
Diseases can also impact the health of Sato Cymbidium orchids. Here’s how to prevent and manage them:
### 7.1 Common Diseases
– **Root Rot**: Caused by overwatering and poor drainage, root rot leads to mushy roots and wilting foliage.
– **Leaf Spot**: Fungal infections that cause dark spots on leaves. These may lead to yellowing and eventual leaf drop.
– **Powdery Mildew**: A fungal disease characterized by white, powdery spots on leaves, often resulting from high humidity and poor airflow.
### 7.2 Prevention and Treatment
– **Watering Techniques**: Ensure proper watering techniques are in place. Allow the growing medium to dry between watering sessions to prevent root rot.
– **Good Air Circulation**: Increase airflow around your orchids by spacing them adequately and using fans if necessary. This helps prevent diseases that thrive in stagnant conditions.
– **Fungicides**: If you notice signs of fungal infections, treat your orchids with an appropriate fungicide. Follow the manufacturer’s instructions for application rates and frequency.
## 8. Seasonal Adjustments
Sato Cymbidium orchids have specific needs throughout the seasons. Here’s how to adjust your care routine:
### 8.1 Spring and Summer Care
– **Light and Temperature**: As temperatures rise, ensure that your orchids receive plenty of bright, indirect light. They will thrive in warmer conditions.
– **Increased Watering**: During the growing season, you may need to water more frequently as the plants actively take up moisture.
– **Fertilization**: Increase fertilization frequency during this period to support vigorous growth and flower production.
### 8.2 Fall and Winter Care
– **Reduced Light**: As days shorten and light levels decrease, consider providing supplemental lighting to maintain optimal conditions.
– **Temperature Control**: Ensure that your orchids are protected from cold drafts and extreme temperature fluctuations. Ideally, keep them in a room with consistent temperatures.
– **Watering and Fertilization**: Reduce watering frequency and halt fertilization during dormancy. Allow the plants to rest and conserve energy for the next growing season.
## 9. Overall Maintenance Tips
Maintaining Sato Cymbidium orchids requires ongoing attention to their needs. Here are some overall maintenance tips:
### 9.1 Pruning
– **Removing Dead Leaves**: Regularly prune dead or yellowing leaves to promote airflow and prevent disease. Use sterilized scissors to avoid contamination.
– **Cutting Flower Stalks**: After flowering, cut the flower stalks back to the base of the plant. This encourages new growth and allows the plant to focus its energy on developing new flowers.
### 9.2 Repotting
– **When to Repot**: Repot your Sato Cymbidium orchids every 1-2 years or when you notice that the growing medium has broken down or the roots are pot-bound.
– **Repotting Technique**: Gently remove the plant from its pot, shake off the old medium, and trim any dead or damaged roots. Place the plant in fresh growing medium and water thoroughly.
### 9.3 Record Keeping
– **Maintain a Journal**: Keeping a journal of your orchids’ growth, watering schedule, and fertilization practices can help you track their needs and identify trends over time.
– **Photographic Records**: Documenting the progress of your orchids with photographs can provide insight into their growth patterns and help you adjust care as needed.
## 10. Conclusion
Growing Sato Cymbidium orchids from seedlings requires careful attention to their specific needs, from initial planting to advanced care techniques. By following the guidelines provided in this article, you can create a thriving environment for your orchids, ensuring they remain healthy and vibrant.
In summary, successful cultivation involves understanding the requirements for light, water, and nutrition, as well as managing pests and diseases. By making seasonal adjustments and maintaining proper care routines, your Sato Cymbidium orchids will reward you with stunning blooms and a sense of accomplishment as you witness their growth from seedlings to beautiful, flourishing plants. With patience and dedication, you can enjoy the beauty and elegance of these remarkable orchids in your home or garden.